How to Construct Anticomplementary Triangle in Geogebra
In this post I will present an easy two step guide on how to construct the anticomplementary triangle for any given triangle in Geogebra - an online graphing calculator. So let’s get rolling straightaway.
Anticomplementary triangle is not a separate entity on its own, it is defined for a given triangle. So first we need a triangle to begin with. To know what an anticomplementary triangle is check out this post of mine. It can be properly described in two statements :
The sides of the anticomplementary triangle pass through the vertices of a given triangle.
The sides of the anticomplementary triangle are parallel to the sides of the given triangle.
This may not be how it is normally described in most texts but this description helps us with the construction.
Step 1 : Begin by constructing a triangle. Select the tool Polygon under the Polygons section in the shapes menu.

In the graphing panel to the right, click on any three different spots for the three vertices of a triangle. Click again on the first point you drew to complete forming the three sided polygon.
Step 2 : For the anticomplementary triangle of △ABC, select the tool Parallel Line in the Construct section. Click on any vertex of the triangle and the side opposite to that vertex. You will see a line passing through that vertex and parallel to its opposite side.
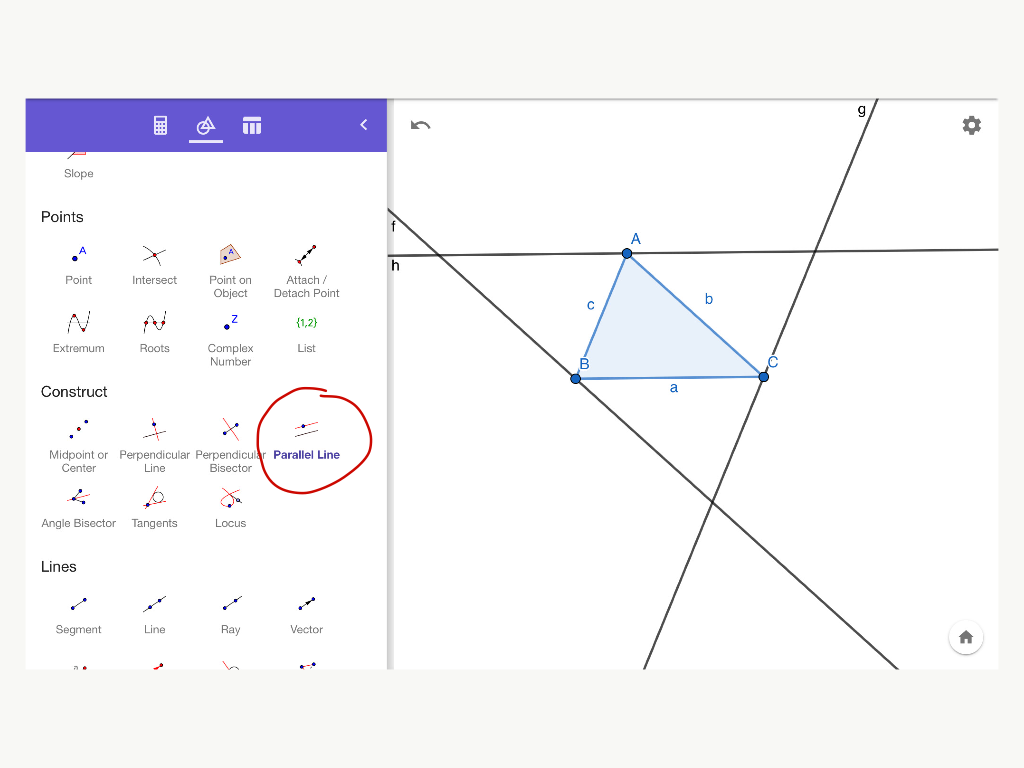
Draw two more lines passing through the other two vertices and parallel to the sides opposite to them.
That’s it. You get a triangle formed by these three lines enclosing △ABC. This is the anticomplementary triangle of △ABC. It passes through the vertices of △ABC and its sides are parallel to the sides of △ABC.
Now as it turns out that the vertices of a triangle are actually the midpoints of its anticomplementary triangle. (In most sources the anticomplementary is generally described as the triangle with midpoints of its sides as the vertices of a given triangle)
A, B and C are the midpoints of the sides of the anticomplementary triangle of △ABC in the figure above. To see that for yourself, first mark the locations of the three vertices of the anticomplementary triangle with points(dots). Select the tool Intersect under the Basic Tools section. Click on a pair of intersecting lines. A point(dot) will appear exactly at the location where they cut.

Similarly, click the other two pairs of lines to mark their points of intersection. In the figure above, D, E and F are the vertices of the anticomplementary triangle.
Choose the Segment tool under the Lines section to define segments DB and BF. Click on the points B & D, and follow it up by clicking on the points E & F.

The segments are not visible because they are overlapping the existing line there. But we can see the names i and j appear representing the segments DB and BF.
Now click on the icon in the shape of a calculator near to the ‘Shapes’ icon in the top left part of your screen. You will find that the lengths of the segments i and j are equal verifying that vertex B is indeed the midpoint of the side DF of the anticomplementary triangle. You can verify the same for the other two vertices A and C.

Comments
Post a Comment