Geogebra - Constructing the Nine-point Circle
In the plane of any given triangle there are nine points that are always concyclic; a circle can be drawn passing through all of them. This circle is called the nine-point circle of that triangle.
These nine points are :
- Feet of the altitudes
- Midpoints of the sides
- Midpoints of the three segments from vertices to the orthocenter
The center of the nine-point circle is called the nine-point center. Here’s a step by step guide on how to construct the nine-point circle for a triangle in Geogebra - an online Graphing Calculator(demonstrated with pictures).
We are gonna need a triangle to begin with. I will assume you already know how to construct triangles in Geogebra. But just in case if you don’t, check out this post of mine where you will find ways to construct triangles of three given side lengths or two given side lengths & one given angle. The easiest way to construct any casual triangle is by using the Polygon tool.
Step 1 : In the editing panel on the left, go to the shapes menu(it has an icon of a triangle and a circle intersecting). Inside this menu, in the Polygons section, select the first option - Polygon.

After the Polygon tool is selected, mark the locations of the three vertices of your triangle by clicking on three different spots in the graphing panel on the right. Click again on the first point you made to complete the three sided polygon.
(For clarity purposes, i have kept the two axes and the grid hidden in the graph)
Step 2 : If it is an obtuse angled triangle that you have drawn, then you would need to extend the three sides beyond the limits of the triangle. Select the Line tool in the menu under the Lines section.

Click on the vertices A and B in any order to draw a line containing the side AB. Similarly, click on the vertices B & C and A & C to draw lines containing the sides BC and AC.
Step 3 : Construct the altitudes. Select the tool named Perpendicular Line under the Construct section.

To draw an altitude, click on a vertex first and then the opposite side to the vertex(or the line containing the opposite side). Similarly, draw the other two altitudes of your triangle. You will also spot the location of the orthocenter - point where the three altitudes of your triangle are intersecting.
Step 4 : Mark the feet of the three altitudes, i.e. the locations where the three altitudes meet the three sides or the lines containing the three sides. Select the tool named Intersect under the Basic tools section.
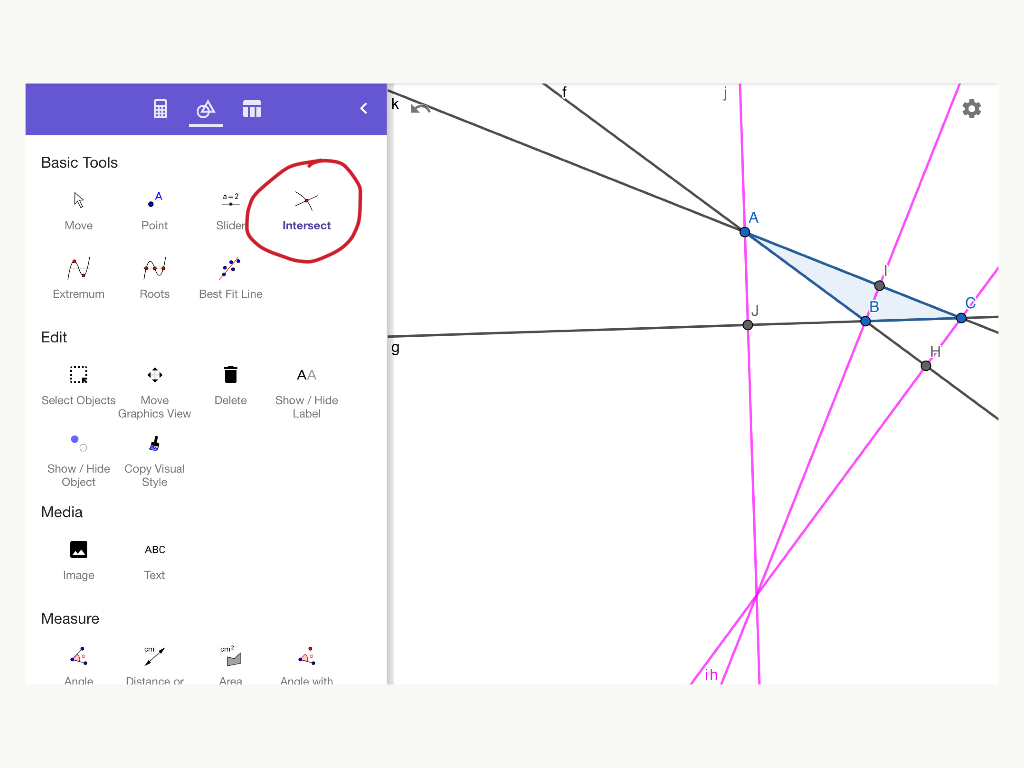
Click on an altitude and the side. The point(dot) will appear automatically where they are intersecting. In the above figure, J, H and I are the feet of the three altitudes.
Step 5 : Find/Mark the midpoints of the three sides. Select the tool Midpoint or Center under the Construct section.

To draw the midpoint of any side say AB, just click on the vertices A and B in any order. The point will appear exactly in the middle. E, F and G are the midpoints of the sides in the figure above.
Step 6 : Mark the location of the Orthocenter of your triangle with a point(dot). Again select the tool Intersect under the Basic tools section and click on any two altitudes of the triangle. A point(dot) will appear at the location of your orthocenter. In the given figure, point D is the Orthocenter. (See in the picture below)
Step 7 : Mark the midpoints of the line segments from the vertices to the orthocenter. Again select the Midpoint or Center tool under the Construct section.

Select the vertex A and the orthocenter D. The point will show up exactly in the middle of the two. Similarly, mark the midpoints of segments BD and CD. In the given figure, they are named K, L and M.
Step 8 : Finally draw the nine-point circle. Select the tool Circles through 3 Points under the Circles section.

Click on any three of the nine points J, H, I, E, F, G, K, L, M. The circle will show up passing through all of these nine points.
Comments
Post a Comment